How to use a hydrometer
A hydrometer is one of the most important tools in the meadmaker's kit. It measures the density of your must or mead relative to water, telling you how much sugar is present — and therefore how much alcohol your mead has produced. Once you understand how to read it, you'll use it at every stage of fermentation.
What is a hydrometer?
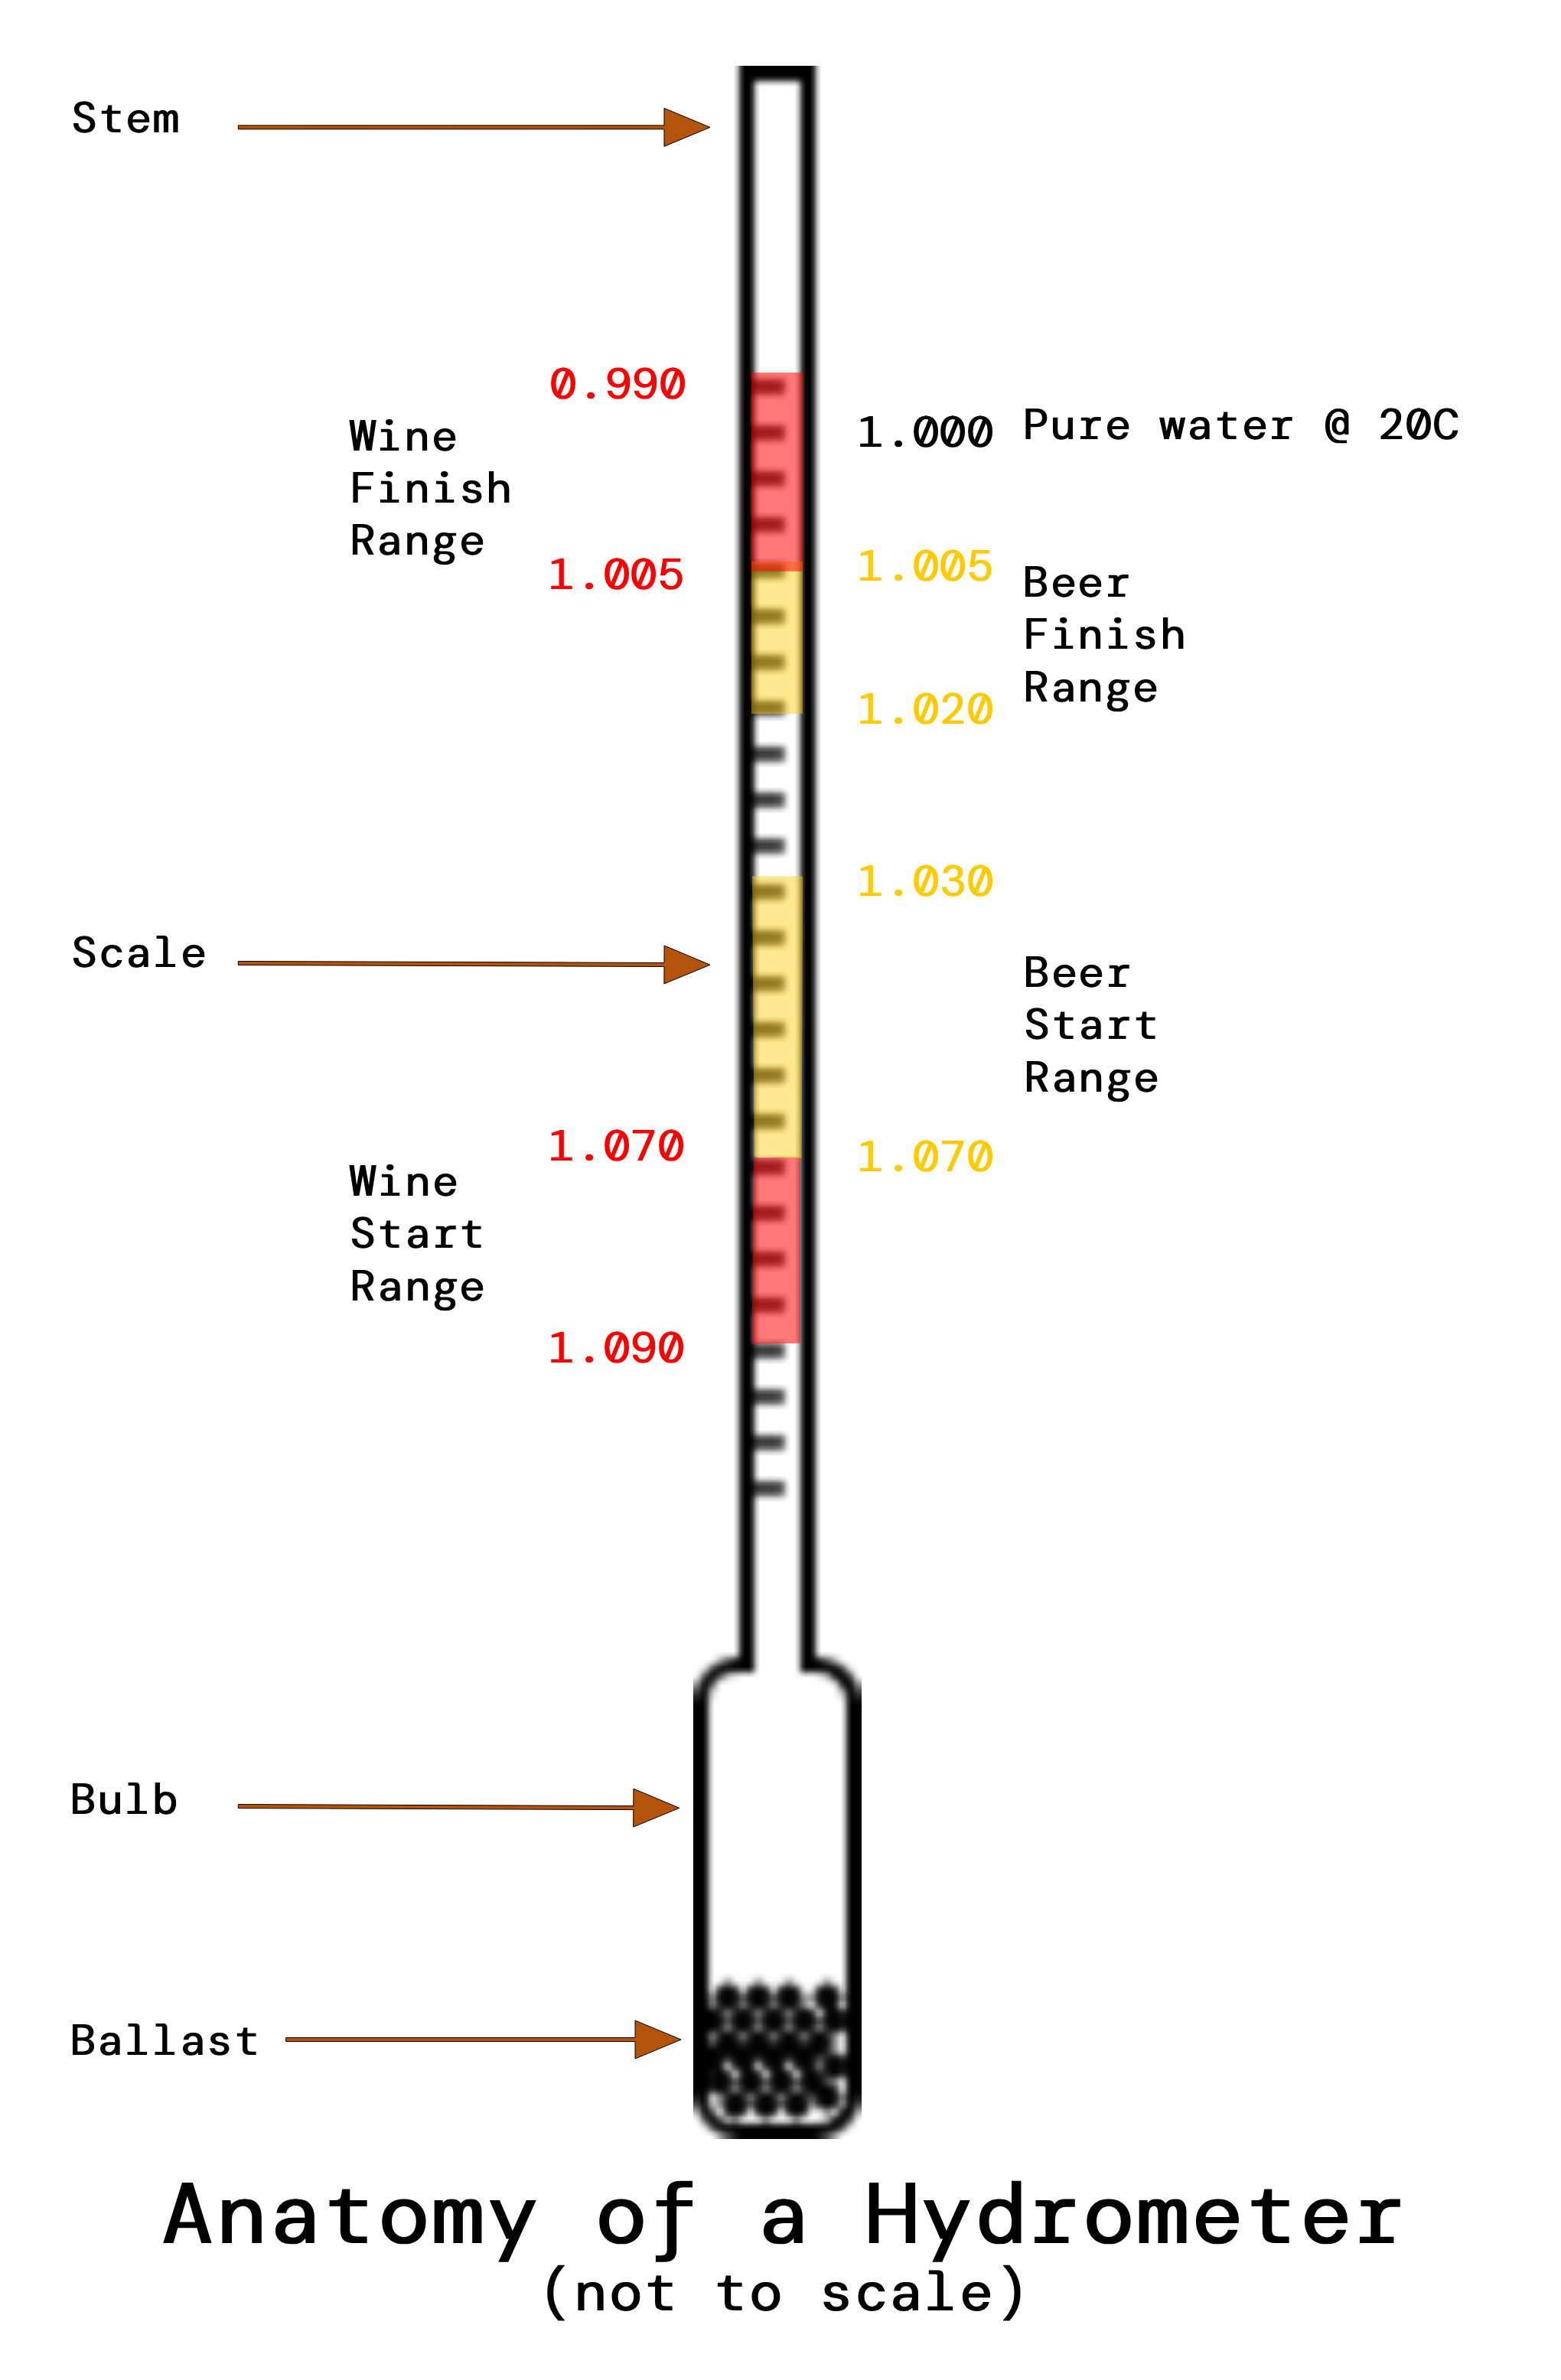
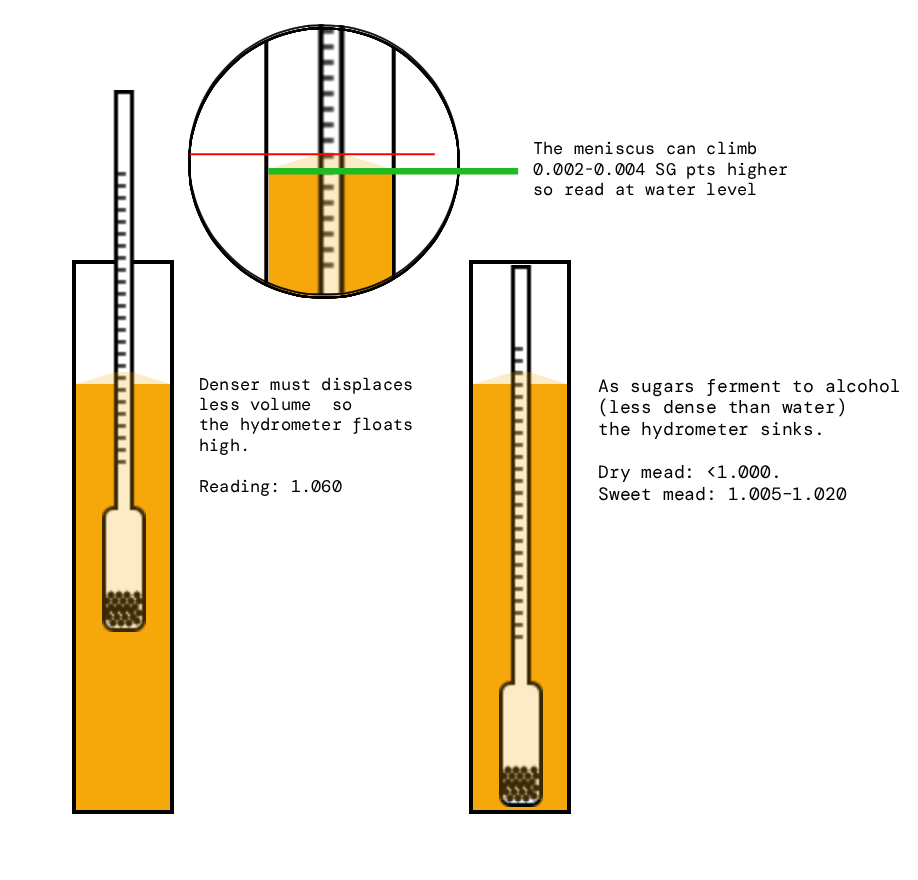
A hydrometer is a sealed glass tube weighted at the bottom. It floats higher in denser liquids and lower in less dense liquids. It is credited as having been invented by Hypatia of Alexandria (our favorite Pagan mathematician) and utilises the Archimedes Principle... originally called the hydroscope, there is record of Synesios of Cyrene writing to her asking for her to make one for him. The device is weighted with ballast so that it points perfectly upwards and the displacement is calibrated for Specific Gravity (SG)which is the ratio of a liquid's density to the density of pure water, read as 1.000. A typical mead must before fermentation might read 1.090–1.120. A finished dry mead typically reads 0.995–1.010. In meadmaking, the density of the must is reduced as sugar is converted to alcohol: a sugary must is denser than water, and a dry finished mead is close to or slightly below water's density, as alcohol is less dense than water.
📷 Photo: hydrometer floating in a test tube
Recommended: clear photo showing the scale and meniscus clearly
Parts of a hydrometer
A standard brewing hydrometer has three parts:
- 1
The bulb — The weighted bottom that keeps the hydrometer floating upright. The weight is usually lead shot or small ballast pellets sealed inside the glass.
- 2
The stem — The narrow tube that extends above the liquid surface. The scale is printed on a paper insert inside the stem.
- 3
The scale — Sometimes shows three scales side by side: The main one is Specific Gravity (SG), Brix (% sugar by weight), and potential ABV. Some homebrew hydrometers have color-coded ranges for Starting Gravity and Final Gravity for Beer (usually yellow) and Wine (usually Red).
Most hydrometers are calibrated at 20°C (68°F) — readings taken at significantly different temperatures will require a small correction (see the temperature correction section). Hydrometers are usually used with a trial jar, a tall, narrow plastic (sometimes graduated) cylinder used to take readings without disturbing your fermenter.
Taking a reading step by step
- 1
Sanitise your hydrometer and measurement tube before use. Sanitize everything, always, that touches your mead. You might get fed up with our repetition of this but believe me, it's not worth skipping.
- 2
Draw a sample using a wine thief or turkey baster. Orthodoxy would have a 3/4 full jar, a lot of people fill almost to the brim, which makes it easier to get an eyeline on the top of the must. I usually put the hydrometer in the jar before I fill it to prevent displacing a spill when adding the must.
- 3
Off Gas. With an actively fermenting must, CO₂ bubbles can cling to the hydrometer stem and give a false low reading by adding buoyancy. Spin the hydrometer gently between your fingers to dislodge them, allowing it to settle before reading.
- 4
Let it float freely. Make sure the hydrometer is not touching the sides of the jar and let it come to rest in the centre of the liquid before reading.
- 5
Read at eye level. Crouch down so your eye is level with the surface of the liquid. Do not read from above because looking down at an angle causes parallax error and produces a reading that is too high.
- 6
The meniscus is when surface tension causes the liquid to curve upward where it meets the hydrometer stem: you can see it if you are surface level. Read the scale at the lowest point of this curve, not the raised edges. It is usually going to be about 0.001–0.002 SG points off. Dark meads can be hard to read, shining a light through the jar can help.
- 7
Take the temperature of your sample and apply a correction if it differs significantly from 20°C (68°F). See the temperature correction section below.
Temperature correction
Hydrometers are calibrated at 20°C (68°F). If your sample is at a different temperature, the density of the liquid itself changes slightly, giving you an inaccurate reading.
The rule of thumb is simple: a sample warmer than 20°C will read lower than the true gravity (add the correction); a sample cooler than 20°C will read higher (subtract the correction).
| Sample temp | Correction to add |
|---|---|
| 10°C (50°F) | −0.001 |
| 15°C (59°F) | −0.0005 |
| 20°C (68°F) | No correction needed |
| 25°C (77°F) | +0.001 |
| 30°C (86°F) | +0.002 |
| 35°C (95°F) | +0.003 |
| 40°C (104°F) | +0.004 |
For most mead situations, if your sample is within 5°C of 20°C the correction is small enough to ignore. For accurate readings, take a sample at or near room temperature by drawing the sample and letting it sit for a few minutes before reading.
Original gravity (OG)
OG is the gravity reading taken before fermentation begins after all the honey and water (and any fruit or other primary additions) have been combined, but before pitching yeast. This tells you how much fermentable sugar is in your must, which along with your yeast selection can be used to determine predicted ABV and YAN requirement.
Take the OG reading carefully and record it. Once fermentation starts, the reading will never return to this value: OG cannot be measured retrospectively. We more or less know what the sugar content of various honeys and fruits average out to, but there are enough variables that reverse engineering is not entirely reliable.
| Mead style | Typical OG range |
|---|---|
| Hydromel (light / session) | 1.040–1.060 |
| Standard mead | 1.080–1.110 |
| Sack mead (strong / sweet) | 1.120–1.160+ |
Final gravity (FG) and attenuation
FG is the gravity reading when fermentation is complete. A dry mead typically finishes at 0.990–1.010. Sweet meads can be created by stopping fermentation intentionally, feeding past the yeast's alcohol tolerance limit and/or back sweetening. These finish higher: 1.020–1.040 or above.
How to confirm fermentation is complete: take gravity readings on two consecutive days. If the SG has not changed between readings, fermentation has stopped, and if you are down around 1.000 the mead is done. Don't rely on airlock activity alone, a mead can appear completely still while still fermenting slowly, or stall and restart if conditions change.
Attenuation is the percentage of sugar that has been consumed:
Apparent attenuation % = (OG − FG) / (OG − 1.000) × 100
Example: OG 1.100, FG 1.010
(1.100 − 1.010) / (1.100 − 1.000) × 100 = 90%
Calculating ABV from your readings
With OG and FG measurements, ABV can be calculated using the advanced non-linear formula:
ABV % = (76.08 × (OG − FG) / (1.775 − OG)) × (FG / 0.794)
| OG | FG | ABV |
|---|---|---|
| 1.060 | 1.005 | 7.4% |
| 1.090 | 1.005 | 11.5% |
| 1.110 | 1.005 | 14.2% |
| 1.120 | 1.010 | 14.7% |
Refractometer vs hydrometer
A refractometer measures Brix (sugar concentration) using light refraction. It only needs a few drops of liquid — making it very convenient for taking readings without drawing a full sample from your fermenter.
The limitation is significant: once fermentation begins, the alcohol in the must affects how light refracts through the liquid, producing readings that are lower than the true gravity. Refractometer readings mid-fermentation and at FG are therefore inaccurate unless you apply a correction formula — which adds complexity and reduces precision.
The practical rule: use a refractometer for OG (pre-fermentation, when there is no alcohol to distort the reading). Use a hydrometer for all mid-fermentation readings and for FG. If you only own one instrument, own a hydrometer.
Care and calibration
- Hydrometers are fragile glass — handle with care, especially when placing them in trial jars.
- Always sanitise before use with a no-rinse sanitiser.
- Rinse thoroughly with clean water after each use to prevent sugar residue from drying inside the tube and altering buoyancy.
- Dry carefully and store in the plastic tube it came in, or somewhere it cannot roll off a surface.
- Check calibration periodically: fill your trial jar with pure water at exactly 20°C (68°F). A correctly calibrated hydrometer reads exactly 1.000. If yours reads 0.998 or 1.002, note the offset and add or subtract it from all your readings. Most brewing hydrometers are accurate to ±0.001 out of the box; a consistent small offset is normal.